
Google Maps for WooCommerce & Elementor — Complete User Guide for the Free and Pro plugins. Written so anyone can follow along, no technical knowledge needed.
Free v1.0.22 • Pro v1.0.0Digital Plug Store Locator adds a beautiful store finder to your WordPress website. Your visitors can search for your physical shops on a Google Map, filter them by distance, category or features, and see all the details of each store — address, phone, opening hours, photos and even which products are in stock at each location.
It comes as two plugins:
| Plugin | What it gives you |
|---|---|
| Digital Plug Store Locator (Free) | The store locator map, store management, categories, attributes, CSV import/export, search & filters, Schema.org SEO data. |
| Digital Plug Store Locator Pro | Everything in Free plus: 3 premium design templates with 8 color themes, business hours & "Open Now" badge, store photo galleries, customer ratings, WooCommerce "Find in stores" button, per-store stock, Advanced one-click Import/Export, and Elementor widgets. |
yoursite.com/wp-admin.digital-plug-store-locator.zip (the Free plugin), then click Install Now.digital-plug-store-locator-pro.zip. That's it — Pro features unlock automatically everywhere.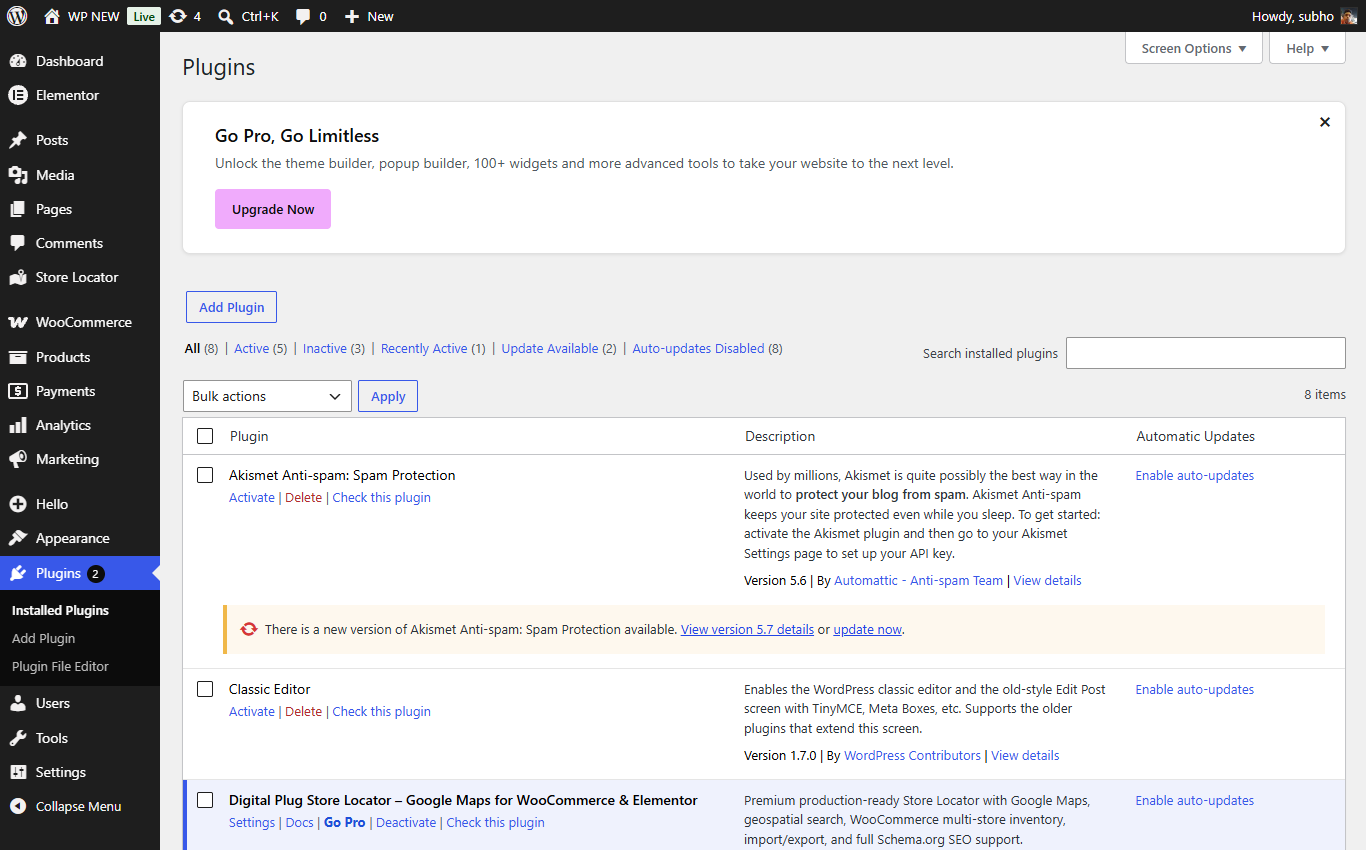
Both plugins installed and active on the Plugins page.
Three small steps and your store locator is live:
[dpsl_store_locator] — then view the page. Done! 🎉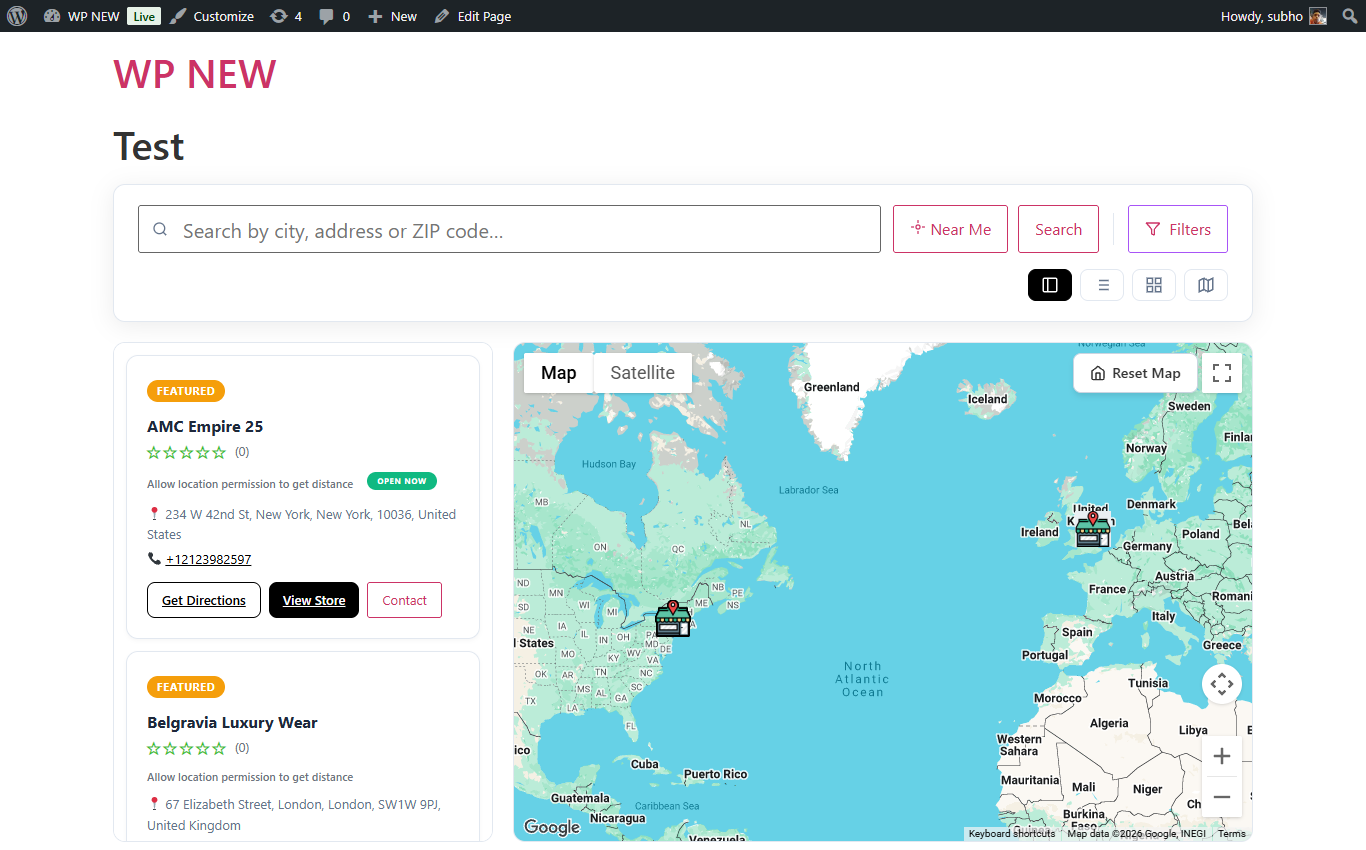
The free store locator: search bar, filters, store list and Google Map.
Every physical shop you own is one "Store" in WordPress. You manage them under Store Locator → All Stores, exactly like normal WordPress posts.
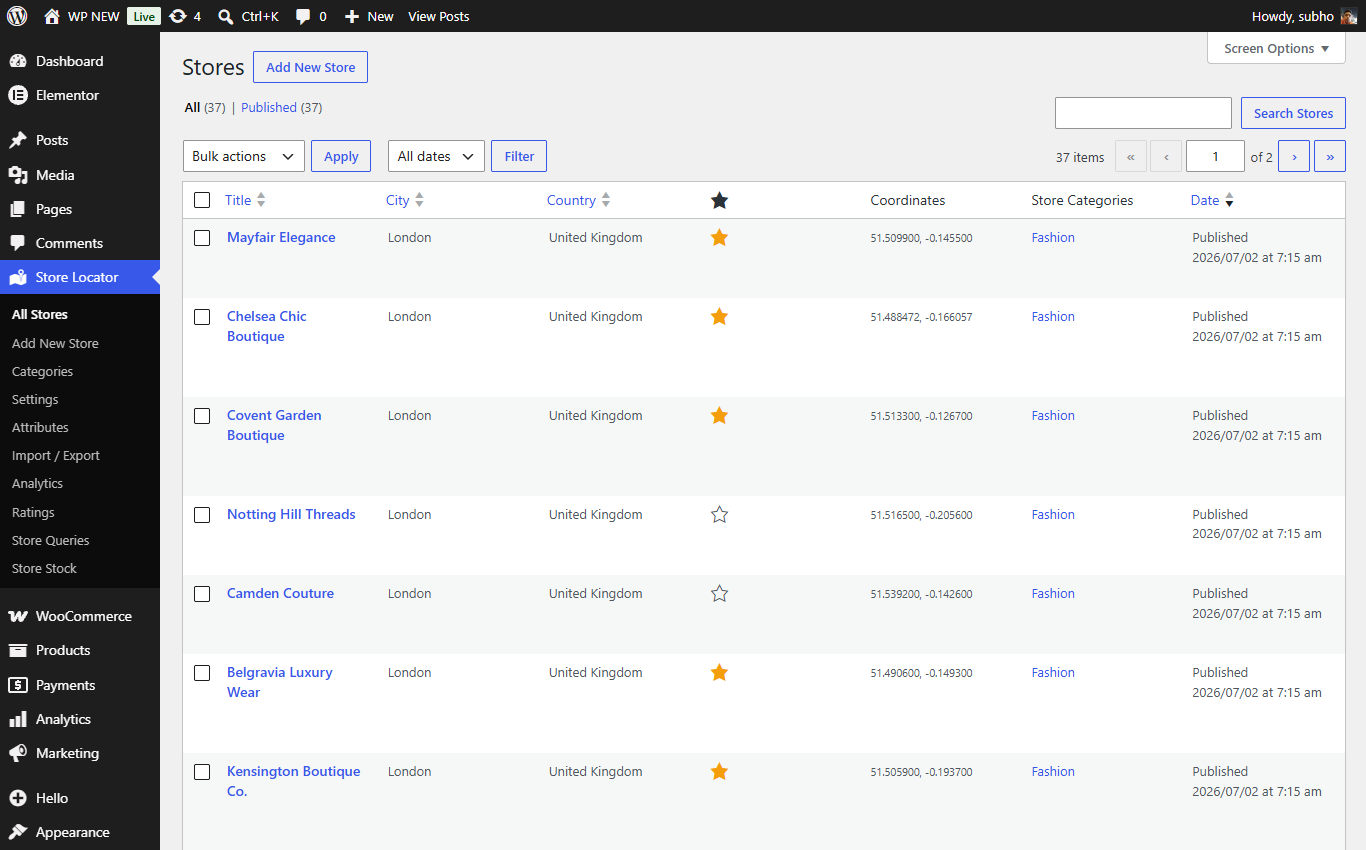
The All Stores screen — search, edit or delete stores here.
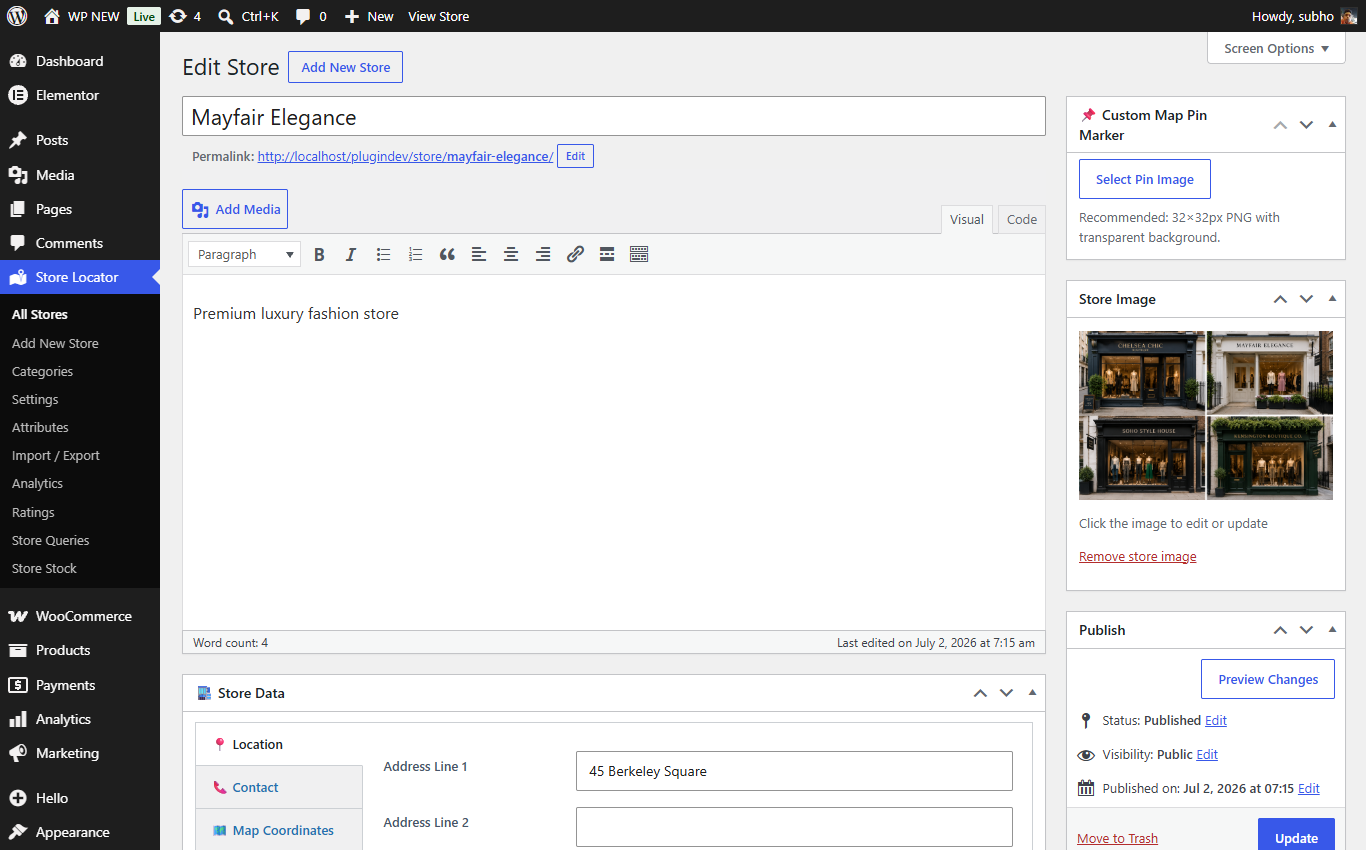
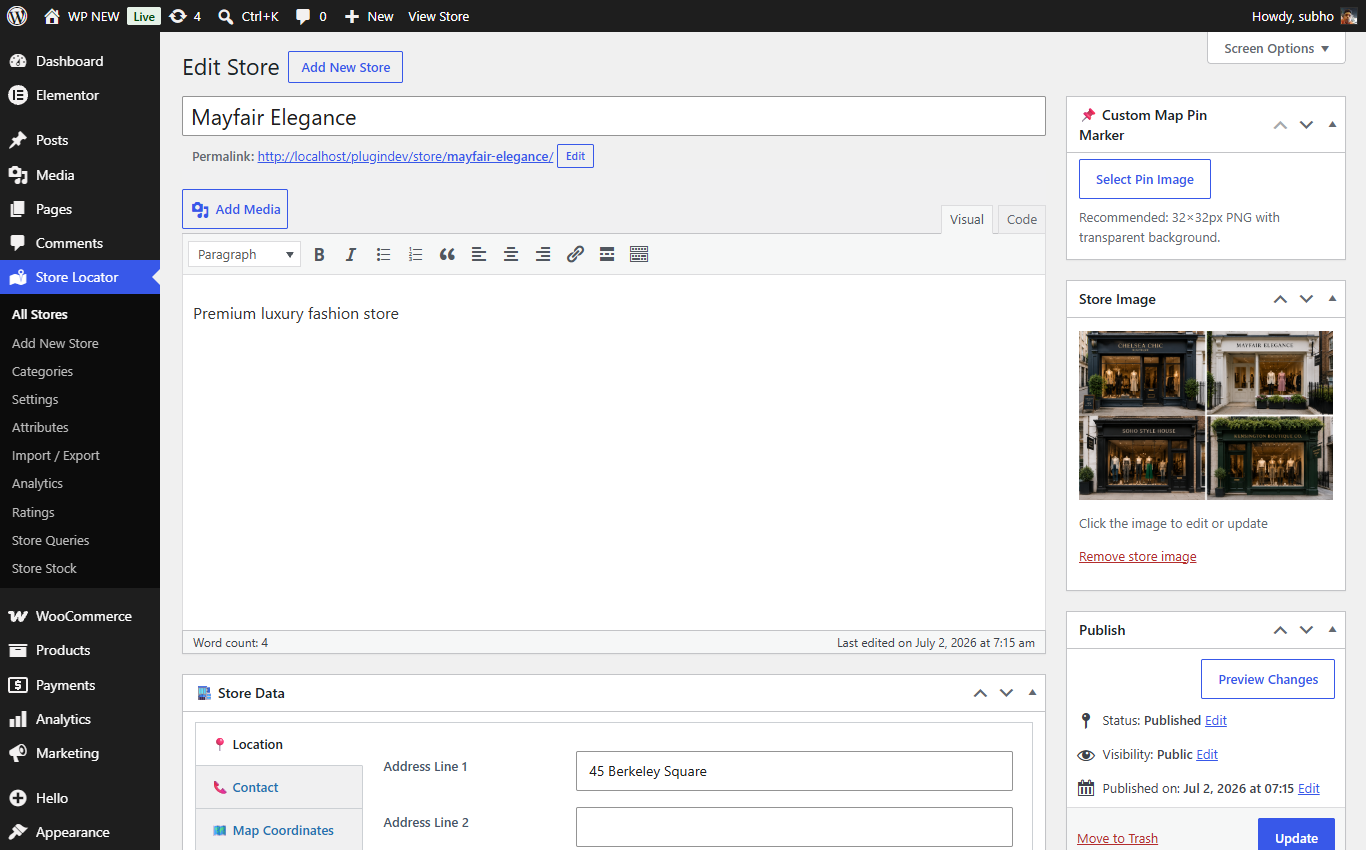
Editing a store: description, Store Data box, store image and custom map pin.
| Field | What to enter |
|---|---|
| Title | The store's name, e.g. "Mayfair Elegance". Shown everywhere. |
| Description | A short text about the store. Shown on the store's own page. |
| Location tab | Address Line 1 & 2, City, State, Country, ZIP. The plugin automatically converts the address into map coordinates for you (this is called geocoding). |
| Contact tab | Phone, Email and Website of the store. |
| Map Coordinates tab | Latitude/Longitude. Normally filled automatically. With Pro you can also click directly on a small map to drop the pin exactly where you want. |
| Store Image | The photo shown on the store card and store page. Click, pick from the Media Library, done. |
| Custom Map Pin Marker | Optional. Upload a small image (32×32px PNG recommended) to give this store its own marker icon on the map. |
| Business Hours Pro | Choose an hours style: Custom Hours (per-day open/close times), Classic Format ("Mon–Fri 9:00–18:00"), 24/7, Open Now, Closed Now, or Permanently Closed. This powers the "OPEN NOW" badge. |
| Store Gallery Pro | Tick "Enable Store Gallery" and add multiple photos with captions. Visitors get a beautiful lightbox slideshow on the store page. |
| Featured | Mark a store as featured to highlight it with a badge in the list. |
Business Hours (Pro): pick a style and set opening times per day.
Categories group your stores by type — for example Fashion, Cafe, Pharmacy. Manage them under Store Locator → Categories. Each category can have its own icon (image or SVG). Visitors can filter by category, and you can even show a page with only one category of stores (see Shortcodes).
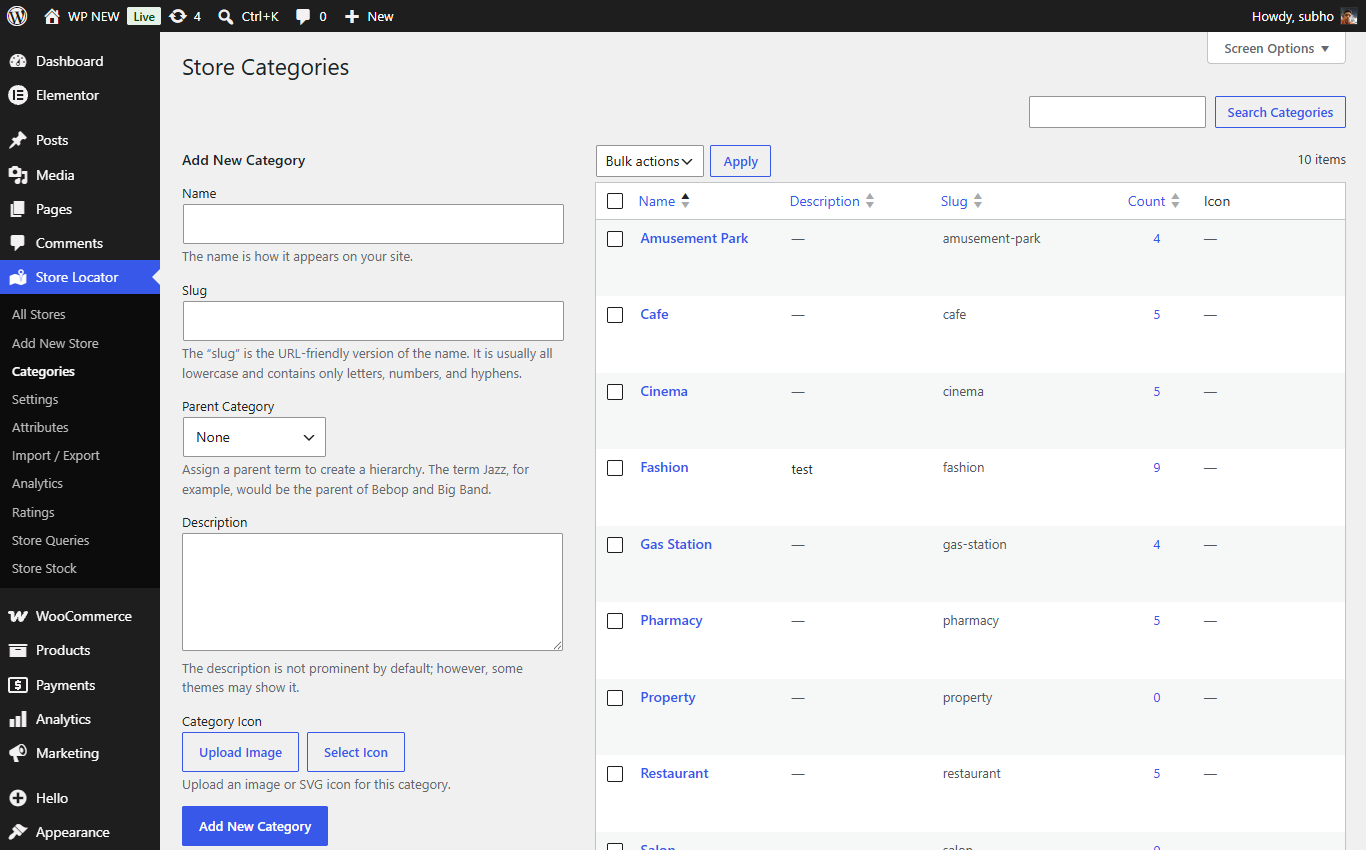
Store categories with optional icons.
Attributes describe the features of a store — for example Services (Delivery, Click & Collect) or Facilities (Parking, WiFi, Wheelchair access). You create the attribute groups yourself under Store Locator → Attributes, then add values ("terms") inside each group. Every attribute automatically becomes a filter option in the store locator.
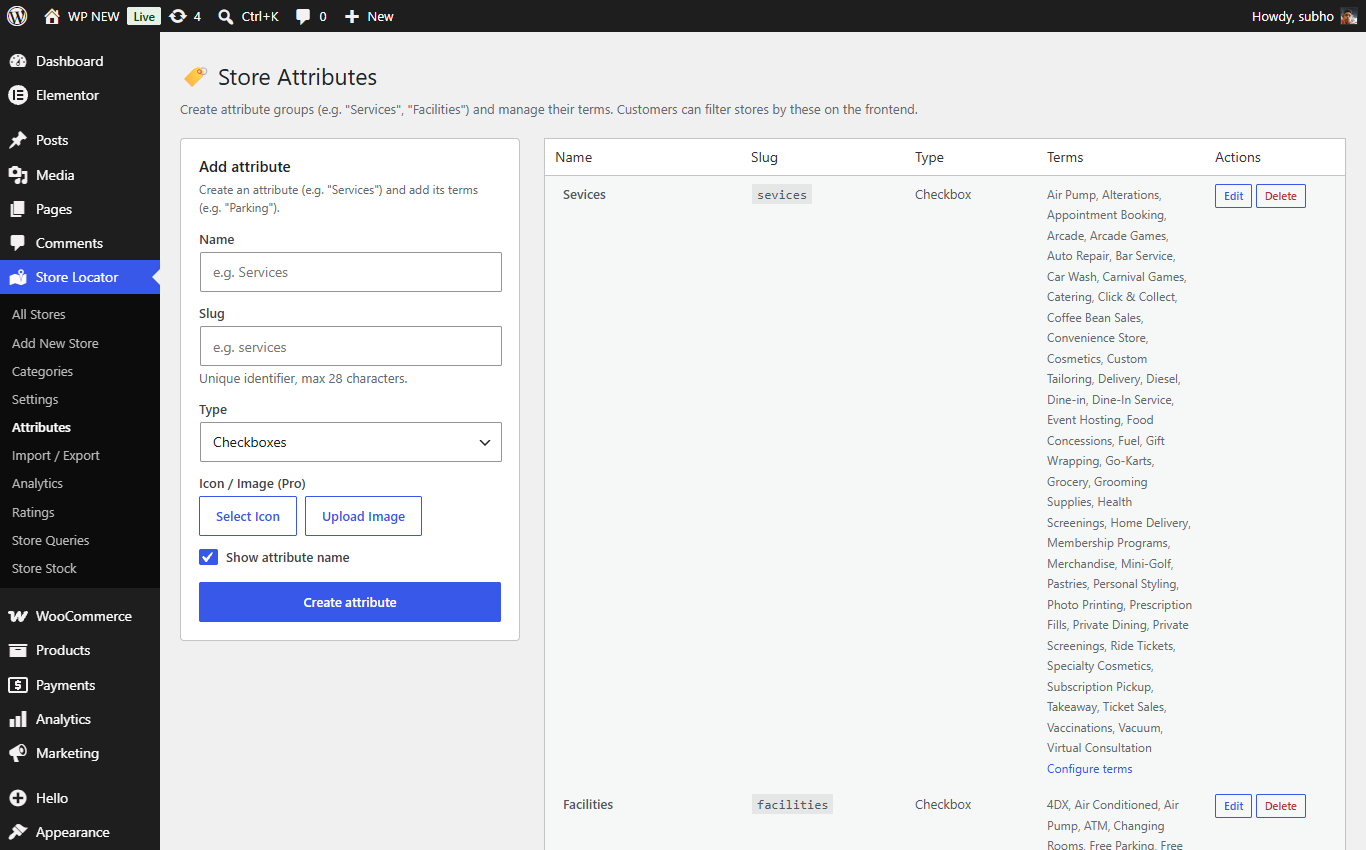
The Attributes manager: create groups like "Services" and add values inside them. With Pro, every value can have its own icon.
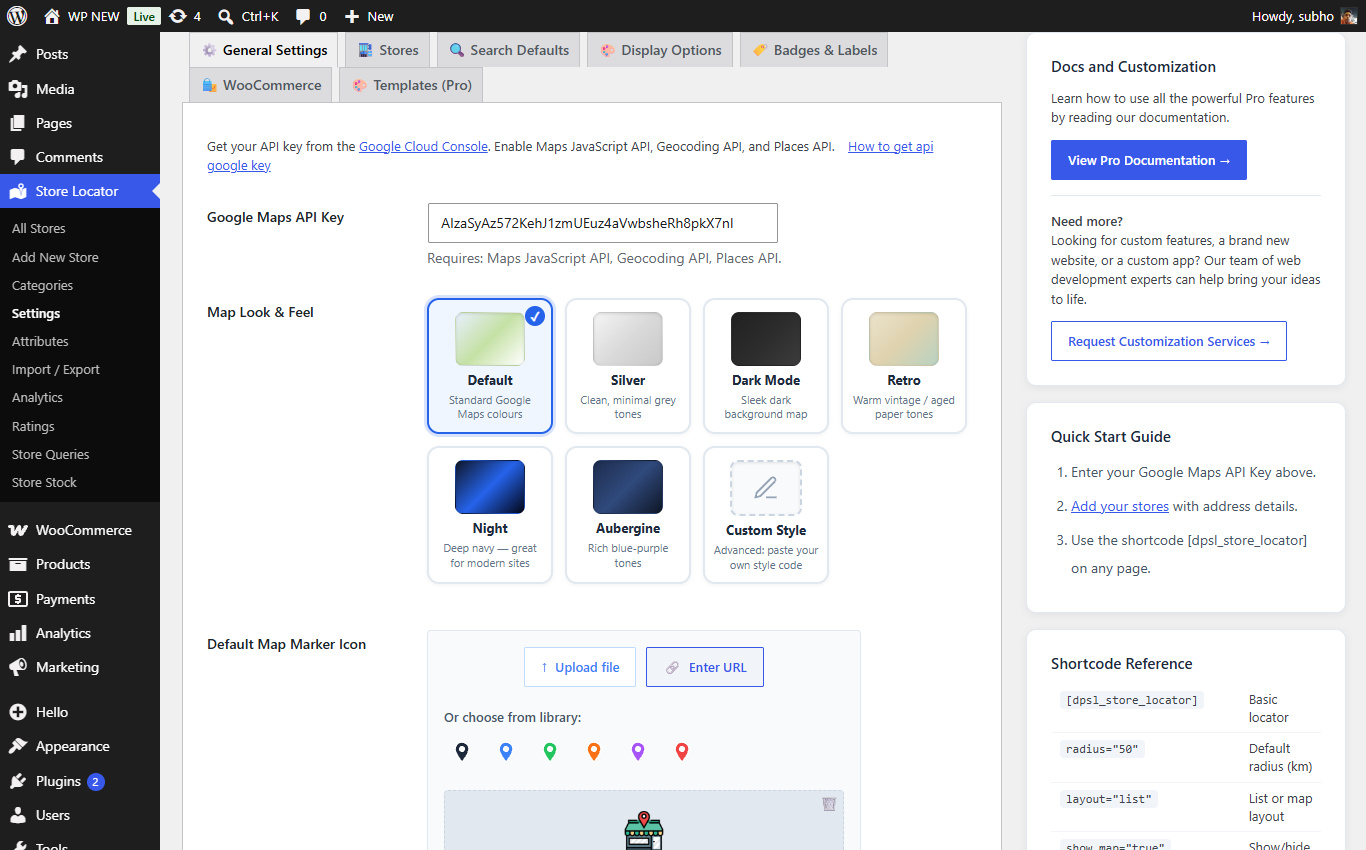
Everything lives on one page: Store Locator → Settings. It is organized in sections; below is what every field does, section by section.
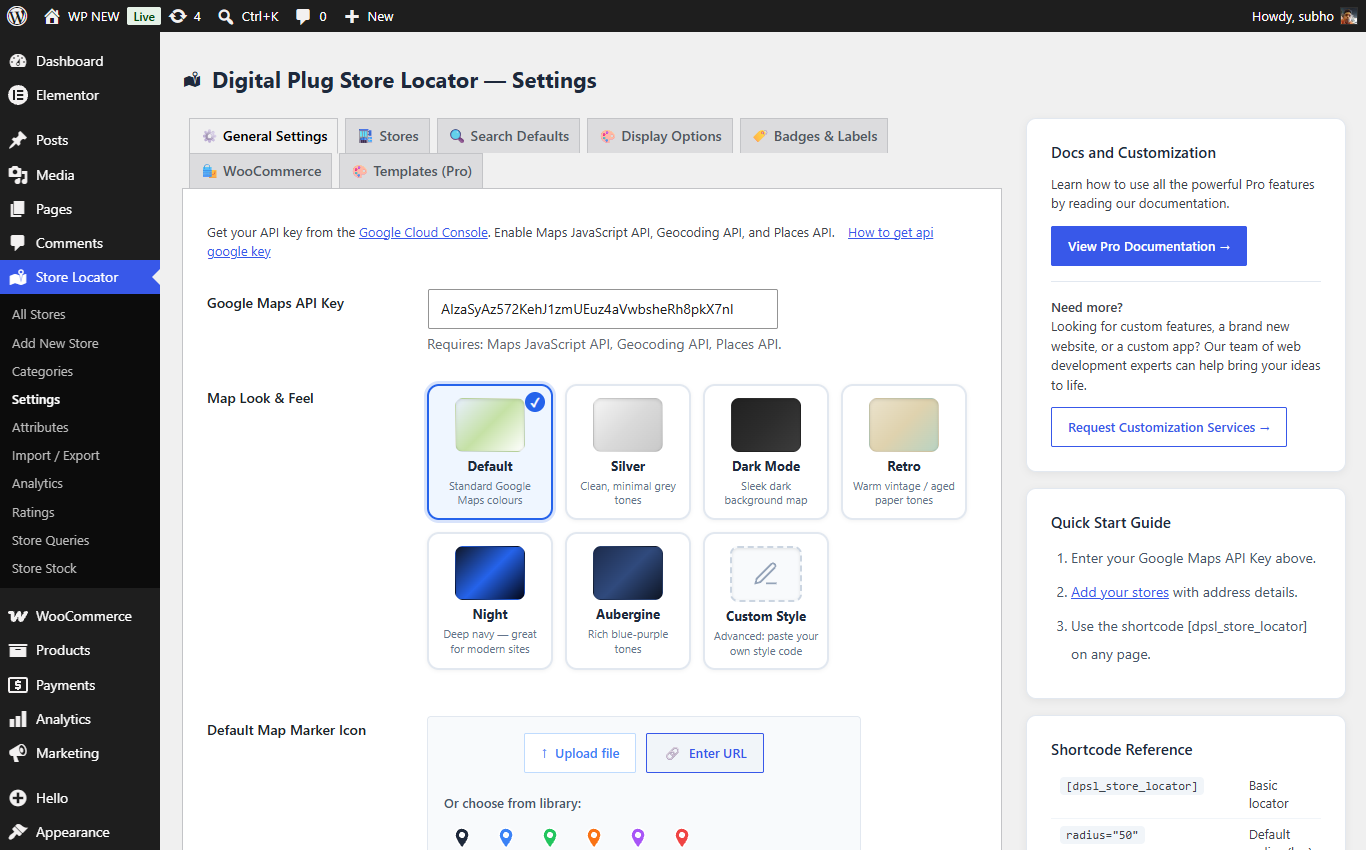
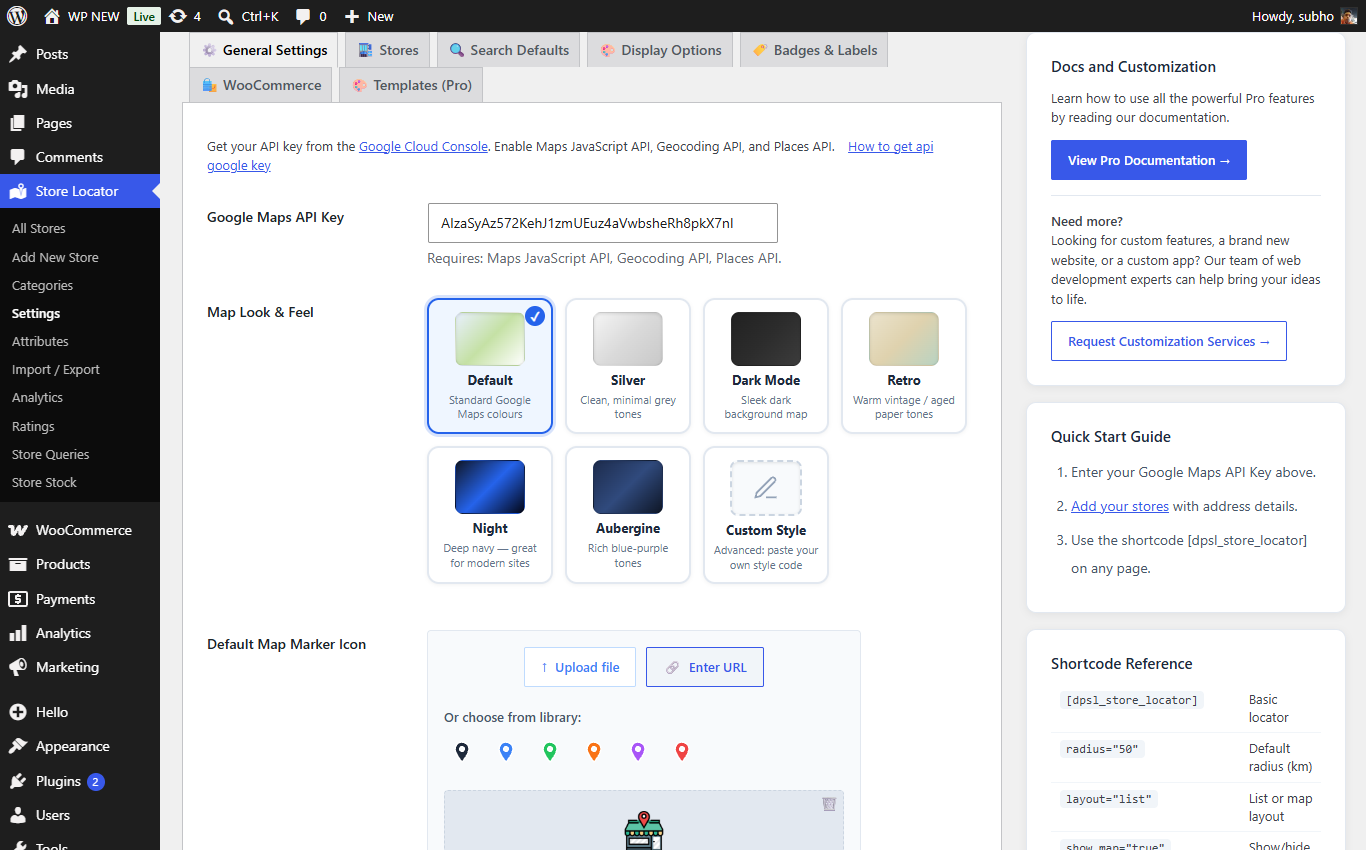
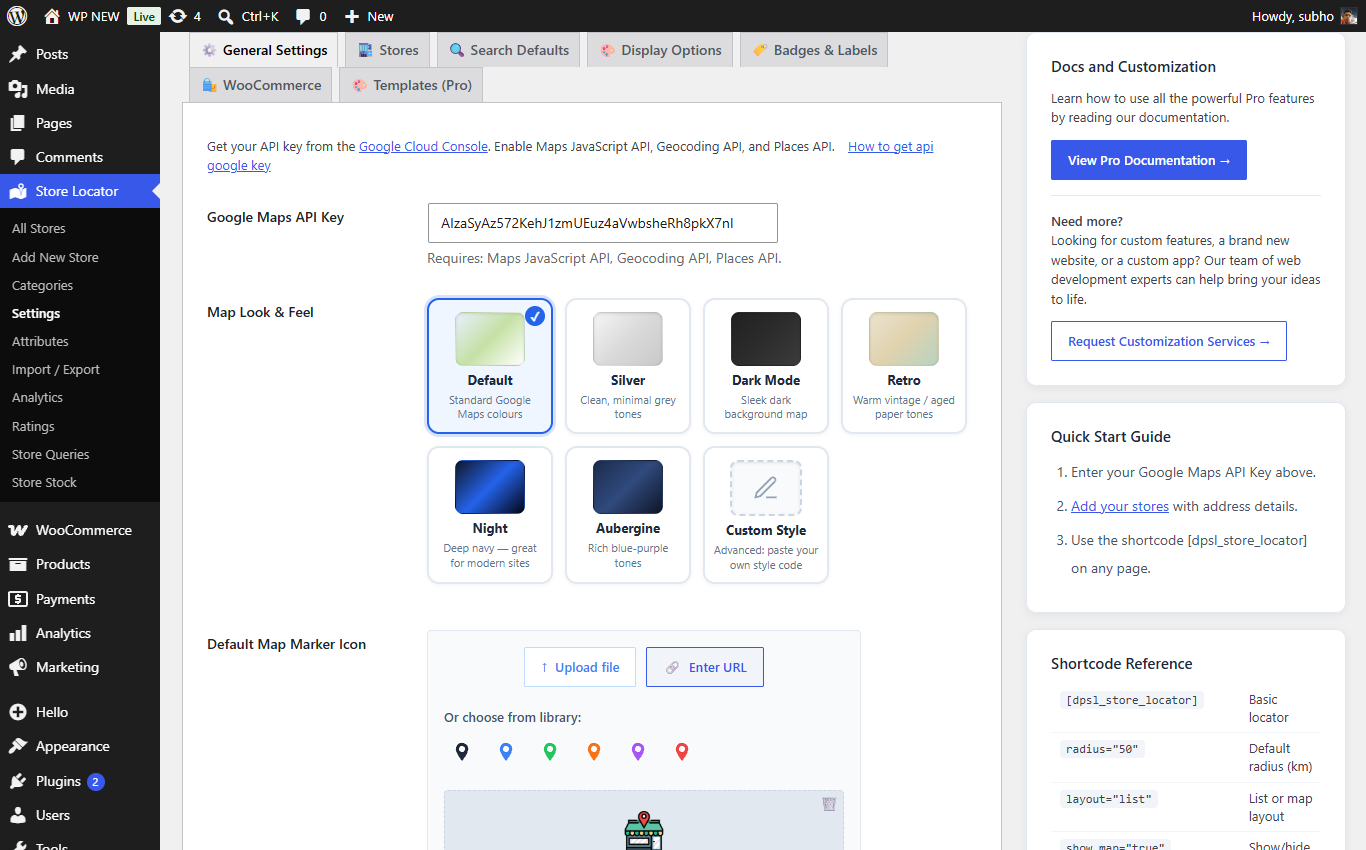
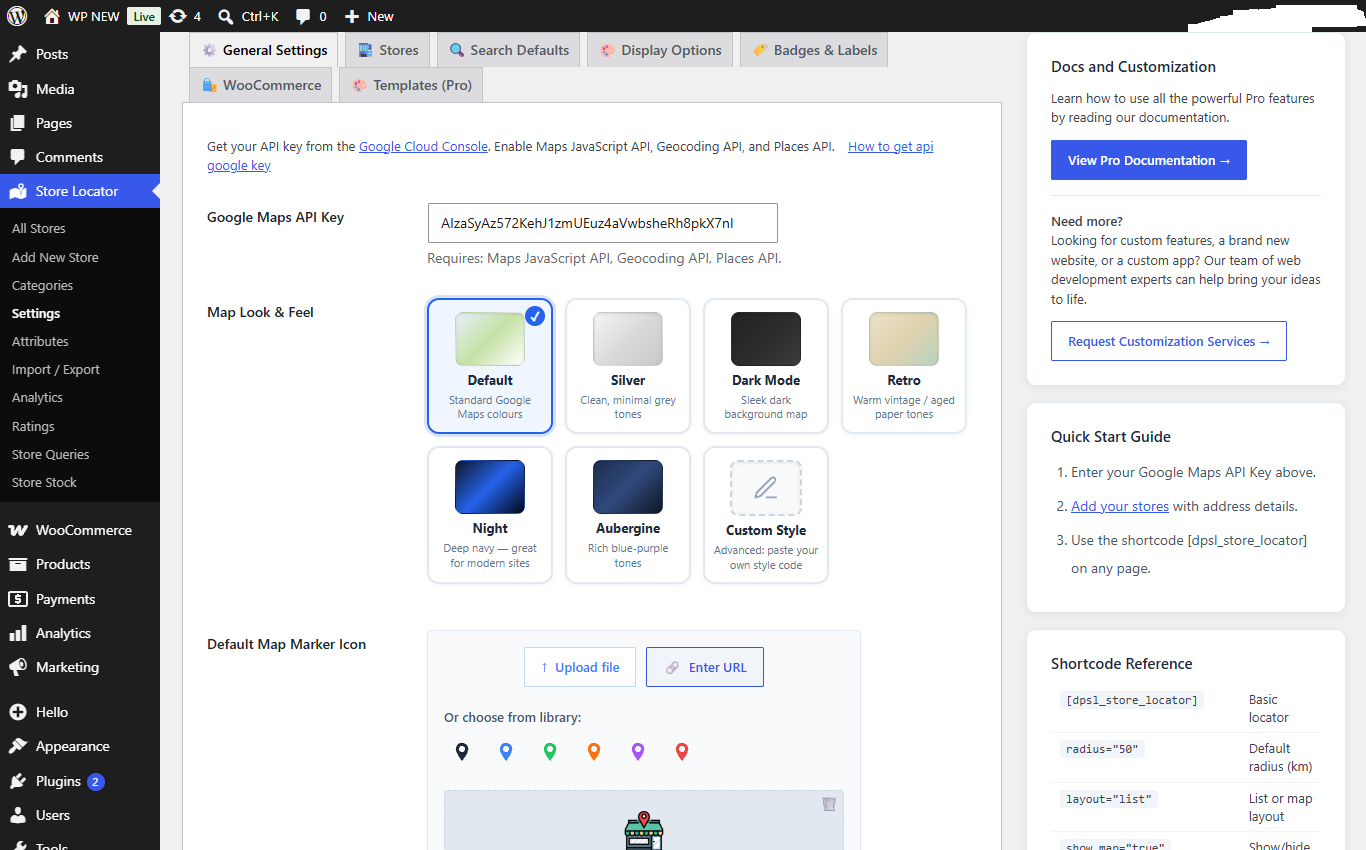
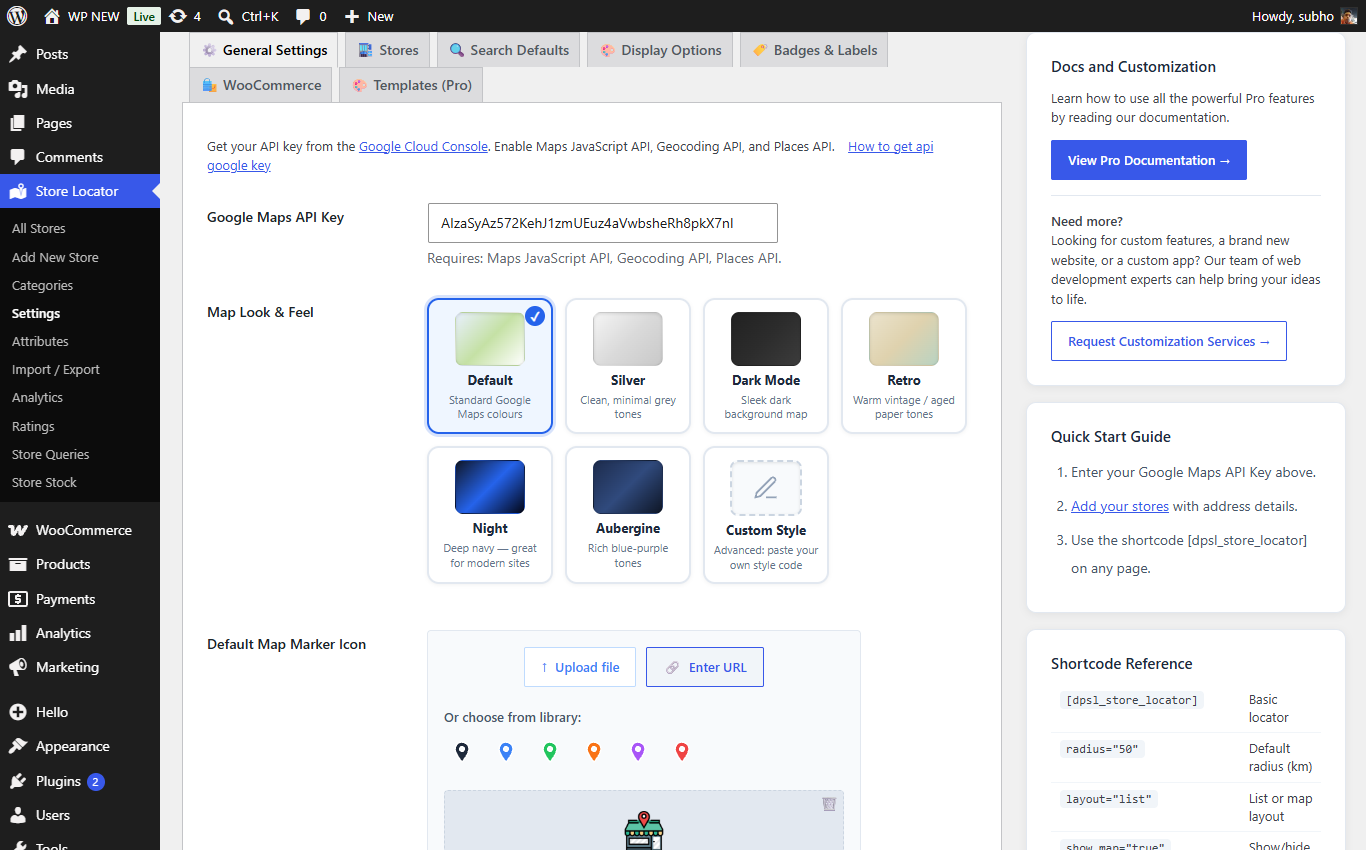
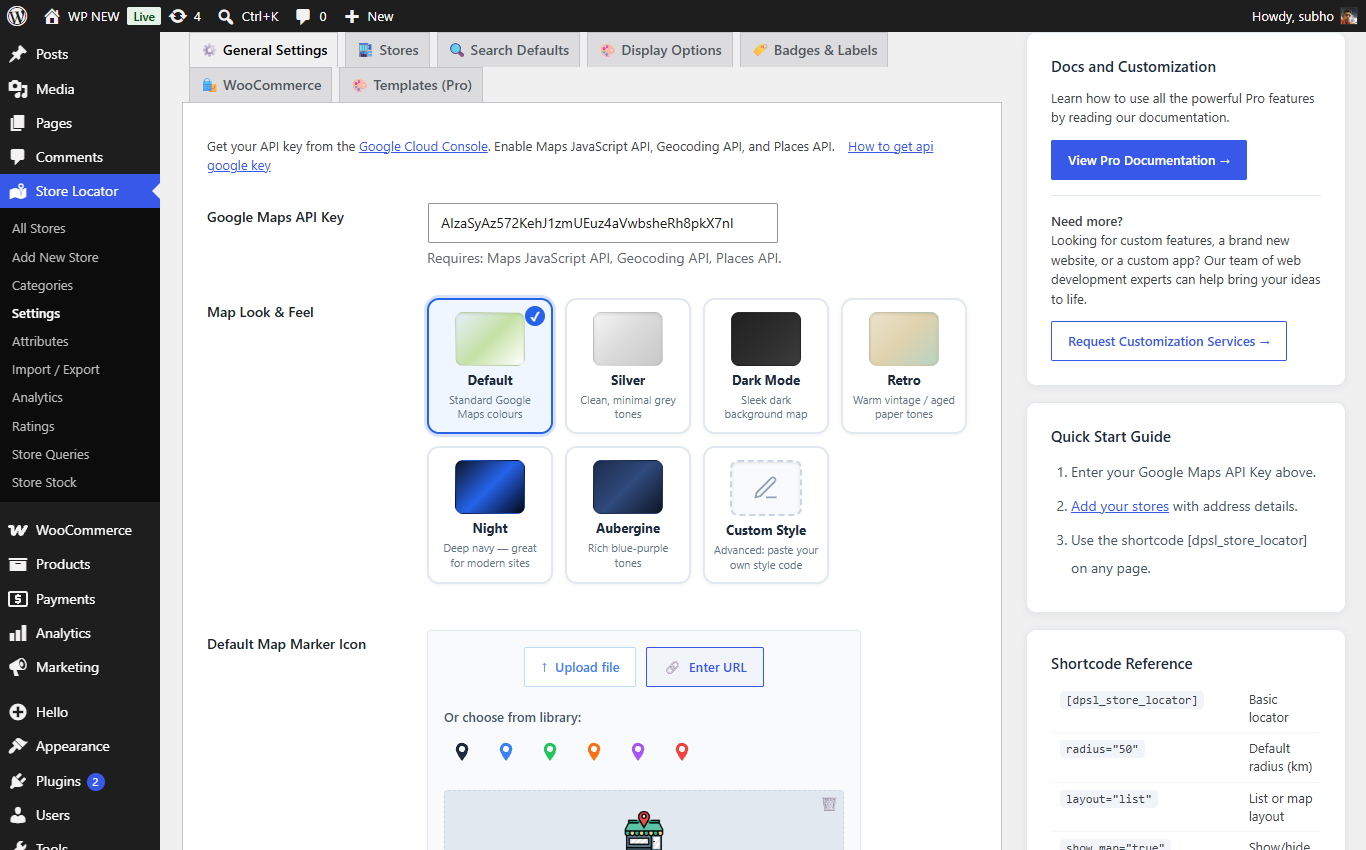
General Settings: API key, map style and default marker.
| Field | What it does |
|---|---|
| Google Maps API Key | The key that lets your site use Google Maps. Required — the map stays blank without it. Video: how to get your key. |
| Map Look & Feel | Ready-made map color styles (e.g. Silver, Night, Aubergine) or paste your own custom map style code. Changes how the map itself looks — try a few, it's fun! |
| Default Map Marker Icon | The pin image used for all stores on the map. Upload your own, pick from the built-in colored pins, or leave the default. (Individual stores can still override this with their own pin.) |
| Store URL Slug | The word used in store web addresses, e.g. yoursite.com/store/mayfair-elegance. Change it to "shop", "branch", "location"… anything you like. |
Search defaults.
| Field | What it does |
|---|---|
| Default Search Radius (km) | How far around the visitor's location the search looks by default. Set it high (e.g. 9999) to show all stores until the visitor narrows it down. |
| Show Store per page | How many store cards appear per page in the list before pagination kicks in. |
Display options: layout, map position and colors.
| Field | What it does |
|---|---|
| Enable Frontend View Switcher Pro | Adds buttons on the locator so visitors can switch between Split / List / Grid / Map views themselves. |
| Layout Columns | Show the store list in 1 or 2 columns. |
| Map Position | Put the map Left, Right, Top or Bottom of the store list. |
| Map Height (px) | How tall the map is, in pixels (500 is a good start). |
| Default Map Zoom | Starting zoom level of the map (higher = closer). |
| Auto-Fit Map to Markers | When ON, the map automatically zooms so all your stores are visible. Recommended. |
| Accent Color | The main highlight color of the locator — match it to your brand. |
| Radius Slider Color / Now Open Toggle Color | Colors of the distance slider and the "Open now" switch. |
| Show "OPEN NOW" Badge Pro | Shows a green "OPEN NOW" label on stores that are currently open (based on each store's Business Hours). |
| Layout setting (Single Store) | Choose between 4 layouts for the individual store page. |
| ✨ Style subsection | Fine-tune every color and text size of the search bar area: search input background/text/border, "Near Me" button, Search button, Filter button, and the little filter chips (normal and active state). If you're unsure, leave the defaults — they look great. |
Badges & labels.
| Field | What it does |
|---|---|
| Featured Badge Text | The word shown on featured stores (default "Featured"). |
| New Store Badge Text | The word shown on recently added stores (default "New"). |
| Distance Unit | km or mi — used for distances everywhere in the free locator. |
| Show Nearest Store Badge Pro | Marks the closest stores to the visitor with a badge. |
| Number of Nearest Stores Pro | How many stores get the "Nearest" badge (e.g. 3). |
| Nearest Text Pro | The badge wording (default "Nearest"). |
The Rating System block inside the Stores section.
| Field | What it does |
|---|---|
| Show Store Image (Stores Listing Page) | Show or hide the store photo on cards in the list. |
| Show Store Attributes (Listing / Single) | Show the store's feature icons (WiFi, Parking…) on the list cards and/or the store's own page. |
| Enable Contact Store Manager (List / Single) | Adds a button that opens a contact form so visitors can message that specific store. Messages arrive under Store Locator → Store Queries. |
| Contact store manager button label | Change the button text (e.g. "Message this store"). |
| Who can contact Store manager | Anyone, or Logged-in users only. |
| Add custom login link | If only logged-in users may contact, send visitors to this login page instead of the default WordPress one. |
| Enable Rating system Pro | Master switch for the whole star-rating feature. |
| Show Rating Stars in Stores page Pro | Shows the average star rating on each store card. |
| Show rating in Single store page Pro | Shows the rating and an "Add Rating" button on the store's own page. |
| Who can give rating Pro | Anyone or Logged-in users only. Each person/IP can rate a store once. |
| Require Rating Approval Pro | When ON, new ratings wait in Store Locator → Ratings until you approve them. Recommended to stop spam. |
| Show how many users has given rating Pro | Displays "(12)" next to the stars. |
| Allow visitor read rating Pro | Lets visitors click and read the written reviews. |
| Rating star Color Pro | Color of the stars (default gold). |
WooCommerce integration settings.
| Field | What it does |
|---|---|
| Show "Find in stores" in product pages Pro | Adds a "Find in stores" button on your WooCommerce product pages, so shoppers can see which physical shops have that product. |
| "Find in stores" position | Where the button appears on the product page (before/after title, price, add-to-cart) — or choose Use shortcode to place it manually. |
| "Find in stores" style / label / icon / colors | Make the button look how you want: plain text, custom-colored button, or your theme's button style, with your own wording and optional icon. |
| Hide "Find in stores" in out of stock products | Hides the button when the product is out of stock everywhere. |
| Button action | What happens on click: open a popup with the store list, or jump to your Store Locator page. |
| "Find in stores" modal title | The heading of the popup window. |
| Store Locator page | Tell the plugin which page holds your [dpsl_store_locator] shortcode. |
| In the store locator modal window show | Choose which store details (address, phone, hours…) appear inside the popup. |
| Enable Product Filter on Stores listing page | Adds a product search to the locator: visitors pick a product and see only stores that have it in stock. |
| Associate all products to all stores | One-click button: marks every product as available in every store. A great starting point — then adjust exceptions in Store Stock. |
| Show available product categories | Shows which product categories each store carries. |
| Automatically associate new products to all stores | New products you add to WooCommerce are automatically marked available in all stores. |
| Enable stock management | Master switch for the per-store stock system (the Store Stock screen). |
| Hide shops in store locator if product is out of stock | When filtering by product, stores without stock disappear from the results. |
Covered in detail in the Premium Templates section below.
A shortcode is a small piece of text in square brackets that you paste into any page or post — WordPress replaces it with the actual store locator when the page is shown.
| Shortcode | What it shows |
|---|---|
[dpsl_store_locator] | The standard store locator (map + search + list). |
[dpsl_store_locator radius="50"] | Start with a 50 km search radius. |
[dpsl_store_locator layout="list"] | Layout style: split, list, grid or map. |
[dpsl_store_locator show_map="false"] | Hide the map, show only the list. |
[dpsl_store_locator per_page="20"] | 20 stores per page. |
[dpsl_store_locator product_id="123"] | Only stores that stock WooCommerce product #123. |
| Shortcode | What it shows |
|---|---|
[dpsl_stores_template template="1"] | Premium Template 1. |
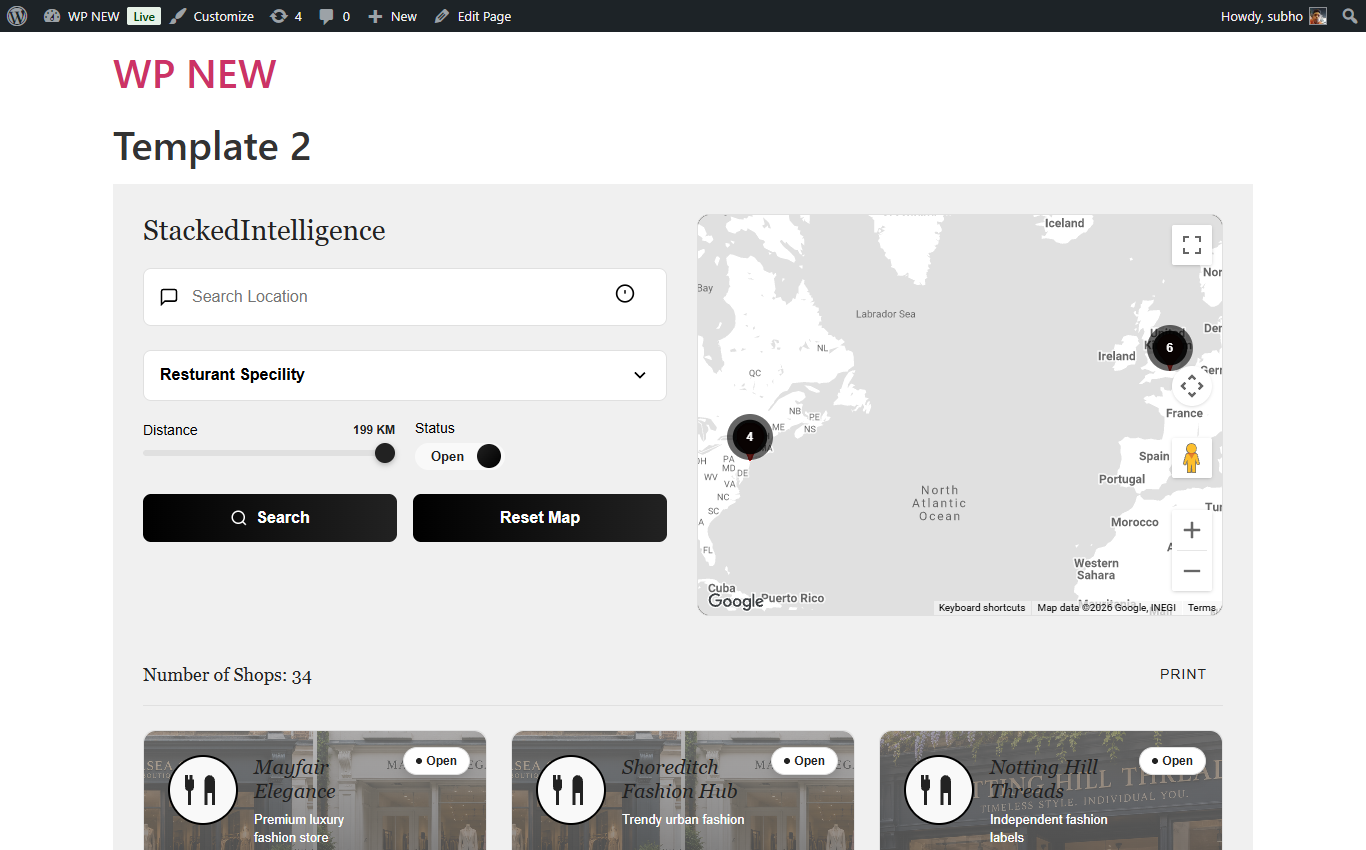
[dpsl_stores_template template="2"] | Premium Template 2 — "Nordic" design. |
[dpsl_stores_template template="3"] | Premium Template 3 — "Spatial Hub" design. |
[dpsl_stores_template template="3" store_category="fashion"] | Template 3 showing only stores from the "fashion" category. Use the category's slug (shown on the Categories screen). |
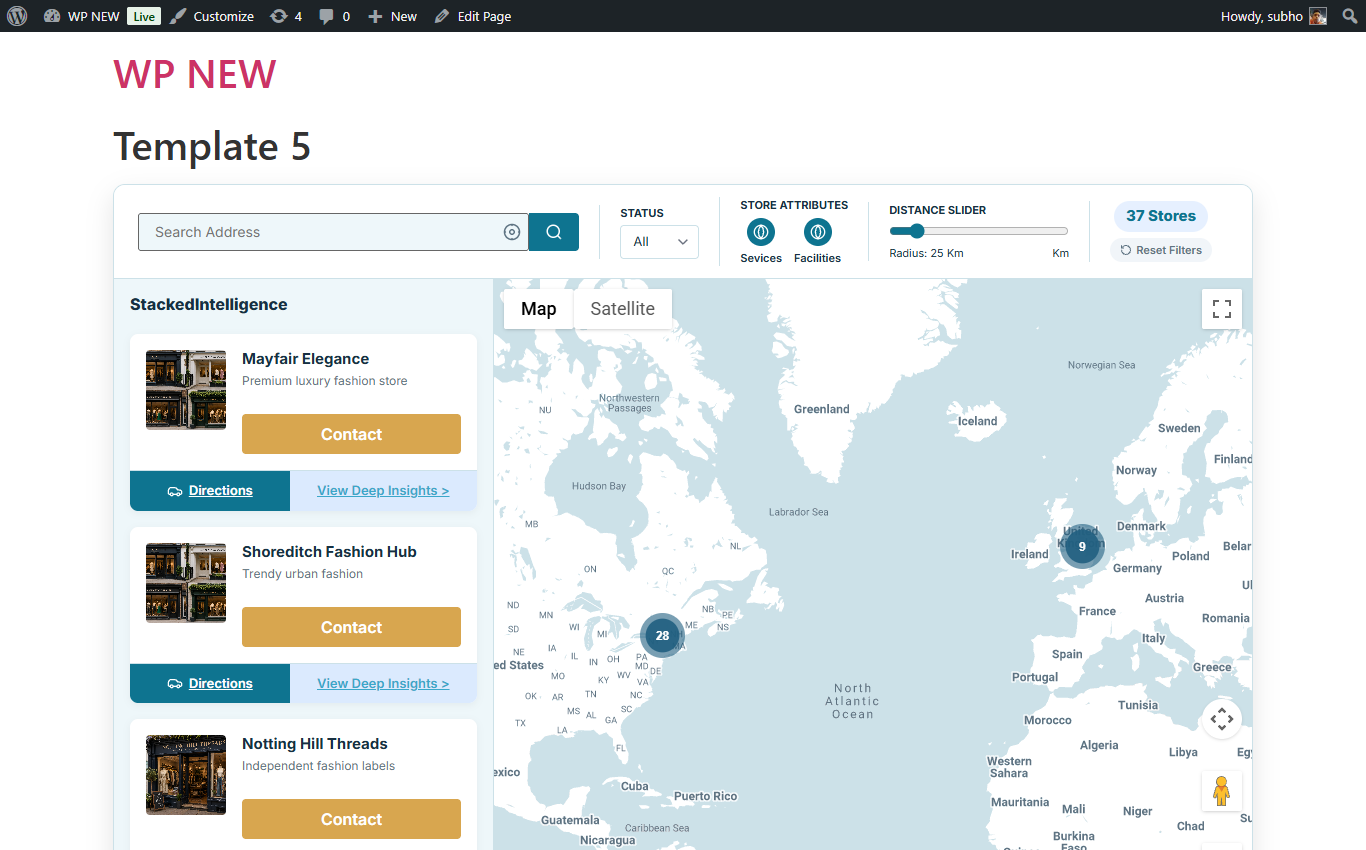
The Pro plugin ships with three complete, professionally designed store locator layouts. You place them with the [dpsl_stores_template] shortcode (see above) and customize each one independently from Store Locator → Settings → 🎨 Templates (Pro).
Template 1 — clean classic layout.
Template 2 — "Nordic": top search bar, sidebar list, hover info cards.
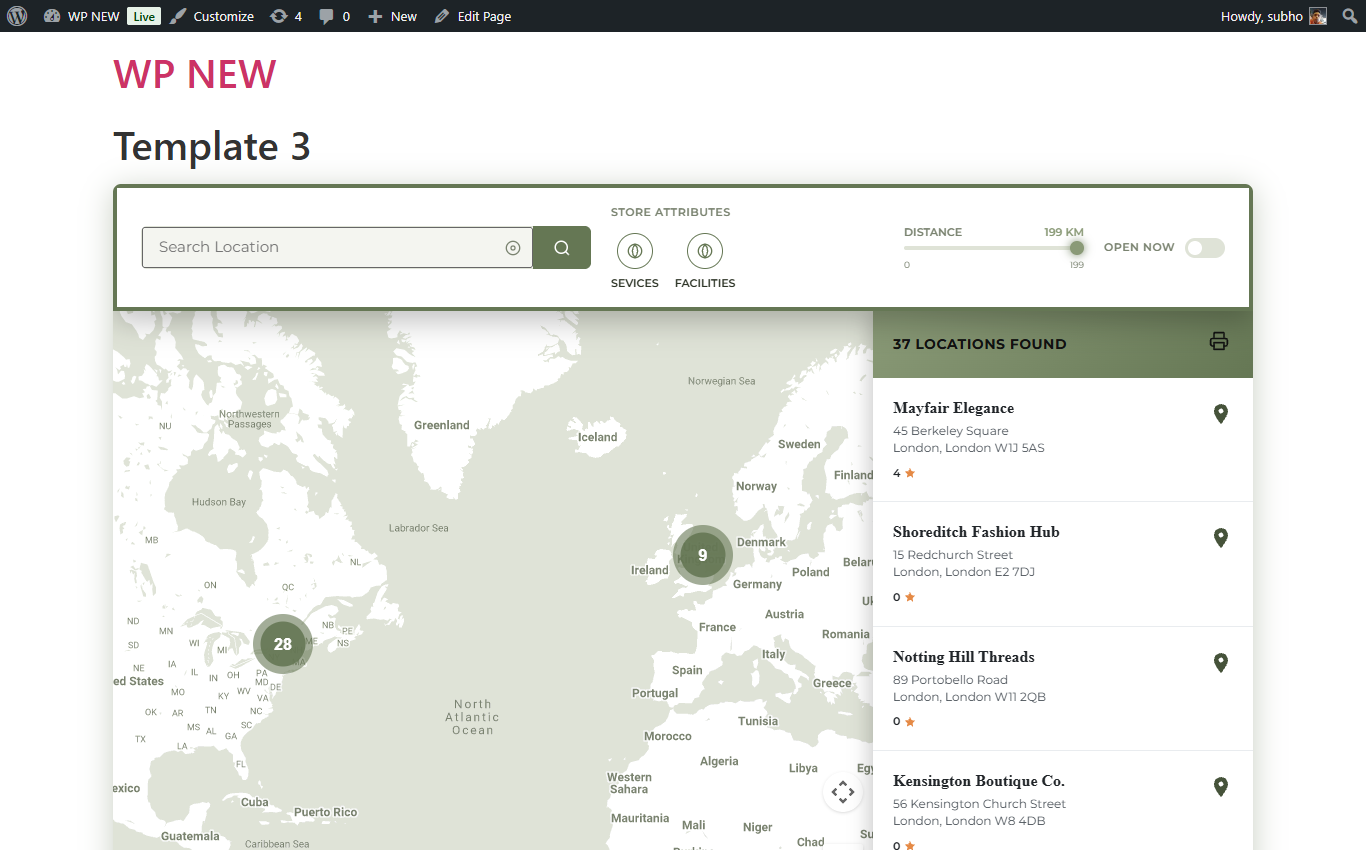
Template 3 — "Spatial Hub": elegant top bar with attribute filters, distance slider, Open Now toggle, sidebar and full map.
The Templates (Pro) section: pick a template, then adjust its own settings.
| Template option | What it does |
|---|---|
| Edit Template Theme | Pick one of 8 ready-made color themes: Dark Default, Mediterranean Blue, Sage & Olive, Royal Emerald, Terracotta Modern, Monochrome, Nordic, Midnight. The whole template recolors instantly. |
| Store List Heading | The title above the store list (e.g. "37 Locations Found"). |
| Store List Icon + Icon Color | A little icon next to the heading, with optional custom color. |
| Select Store Attributes to Filter | Which attribute groups (Services, Facilities…) appear as filter buttons in the top bar. |
| Which Store Attributes will show on store card | Which attribute icons appear inside the store hover card. |
| Show circle around map pin / ripple effect | Decorative highlight around each store's map marker, with an optional animated ripple. |
| Show "Open" badge on store card | Displays the open/closed badge on cards in this template. |
| Show product information | When ON (and WooCommerce is active), the hover card gets a products button — visitors click it and a popup lists the in-stock products of that store with photos and prices. |
| Distance Unit | Kilometers or Miles for this template's distance slider. |
| Max search radius distance | The maximum value of the distance slider. |
| Override contact Store manager level | Overrides the global "who can contact" rule just for this template. |
If you sell products with WooCommerce, the plugin can track which products are available in which physical store, and show that to your customers.
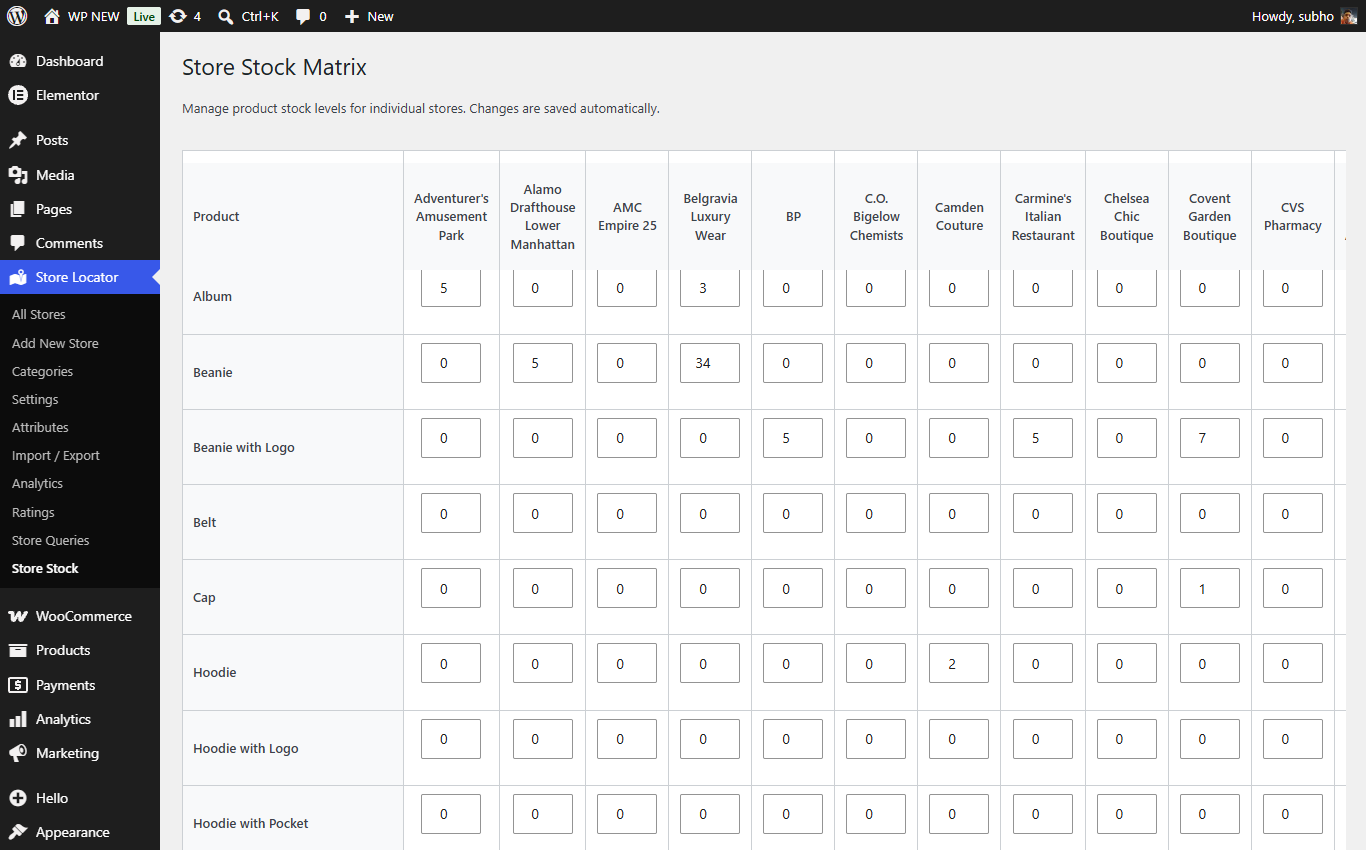
Store Locator → Store Stock: a simple grid of products × stores.
Go to Store Locator → Store Stock. You'll see your products listed with a column for each store. For every product-store combination you set: In stock, Out of stock or On backorder (plus an optional quantity). That's all there is to it.
Each product can work in one of two modes:
| Mode | Behaviour |
|---|---|
| Per-store stock (default) | The plugin uses the Store Stock grid — each store has its own availability for the product. |
| Use global WooCommerce stock | Tick the "override global" option on the product, and the product simply follows its normal WooCommerce stock status in every store. |
Everything lives under Store Locator → Import / Export. There are two systems — simple CSV (free) and the one-click Advanced package (Pro).
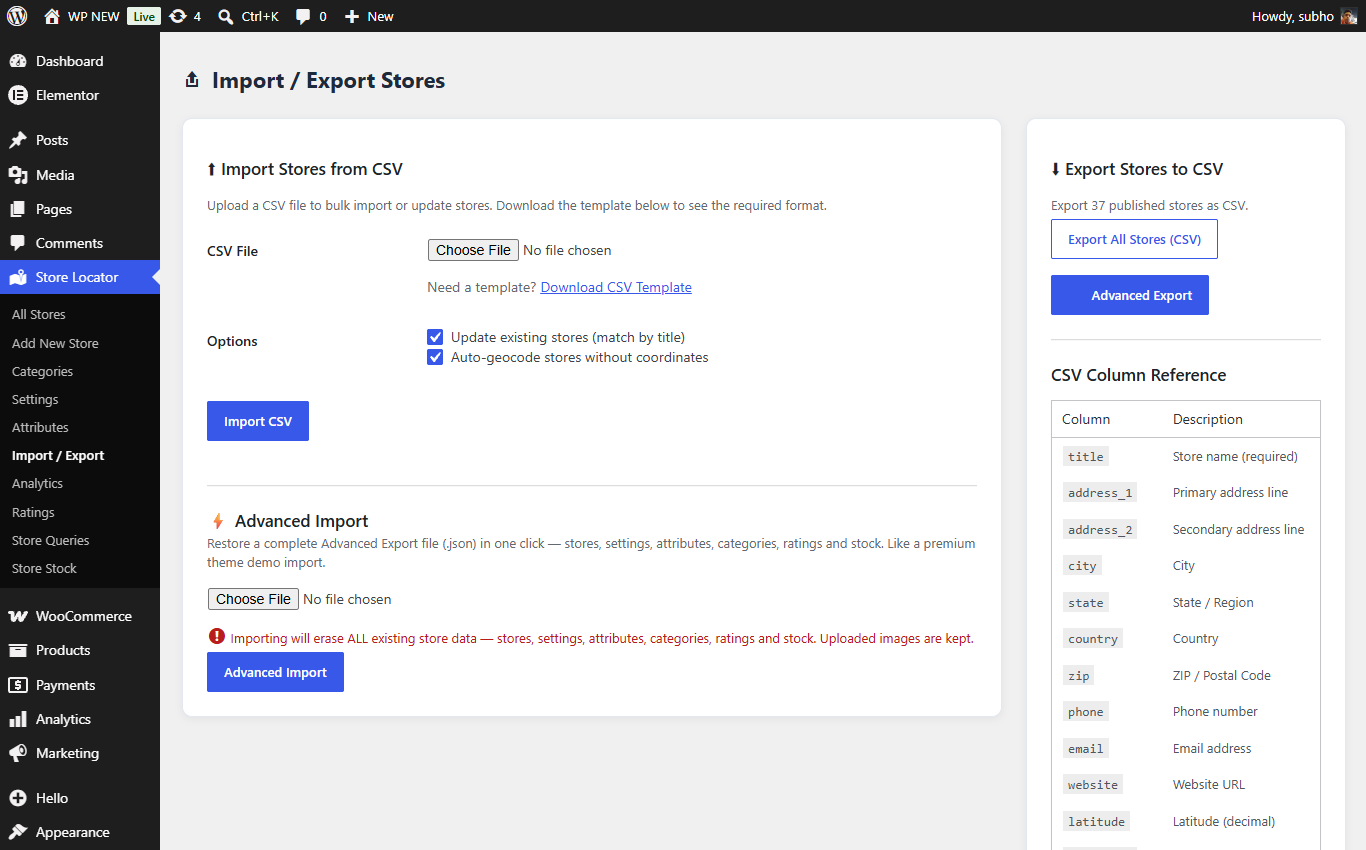
The Import / Export page: CSV on the left, exports on the right, Advanced Import at the bottom left.
Export: click Export All Stores (CSV) — you get a spreadsheet file with one row per store that you can open in Excel or Google Sheets.
Import: perfect for adding many stores at once.
title is required.
Advanced Export: choose "Export All" or a single category.
The CSV covers stores only. Advanced Export packs your entire setup into a single file: every store, all plugin settings, categories, attributes, customer ratings, per-store stock and contact messages. Think of it like a "demo import" file from a premium theme.
Restores an Advanced Export file in one click — on the same site (as a backup restore) or on a completely different site (as a migration).
.json export file.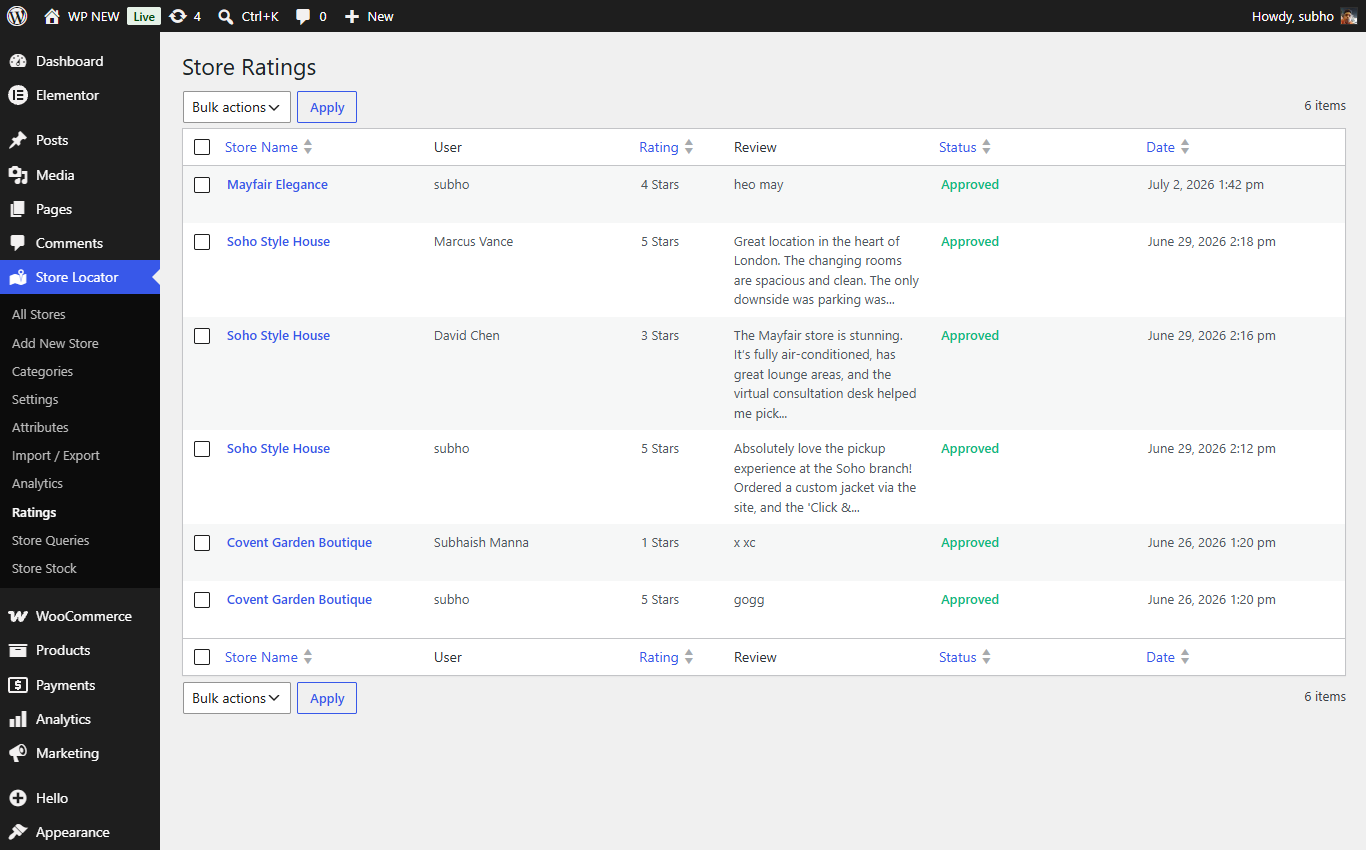
Store Locator → Ratings: approve, reject or delete customer ratings.
Every star rating and review a visitor submits appears here. If you enabled Require Rating Approval, new ratings arrive as "pending" — hover a row and click Approve or Reject. Only approved ratings are shown on your website. You can also select many rows and use the bulk actions menu.
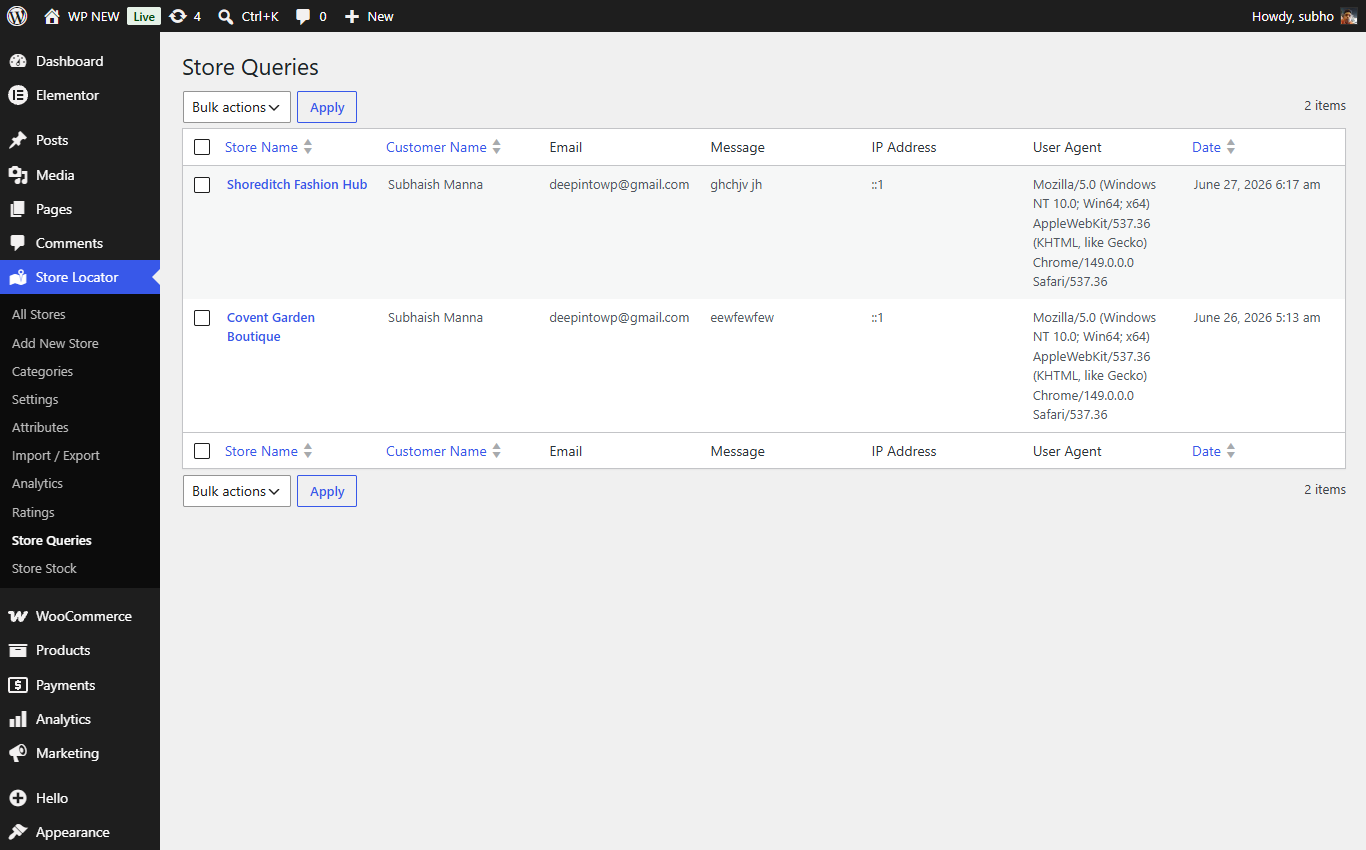
Store Locator → Store Queries: messages sent via "Contact Store Manager".
When a visitor uses the Contact Store Manager button, their name, email and message land here, tied to the store they asked about.
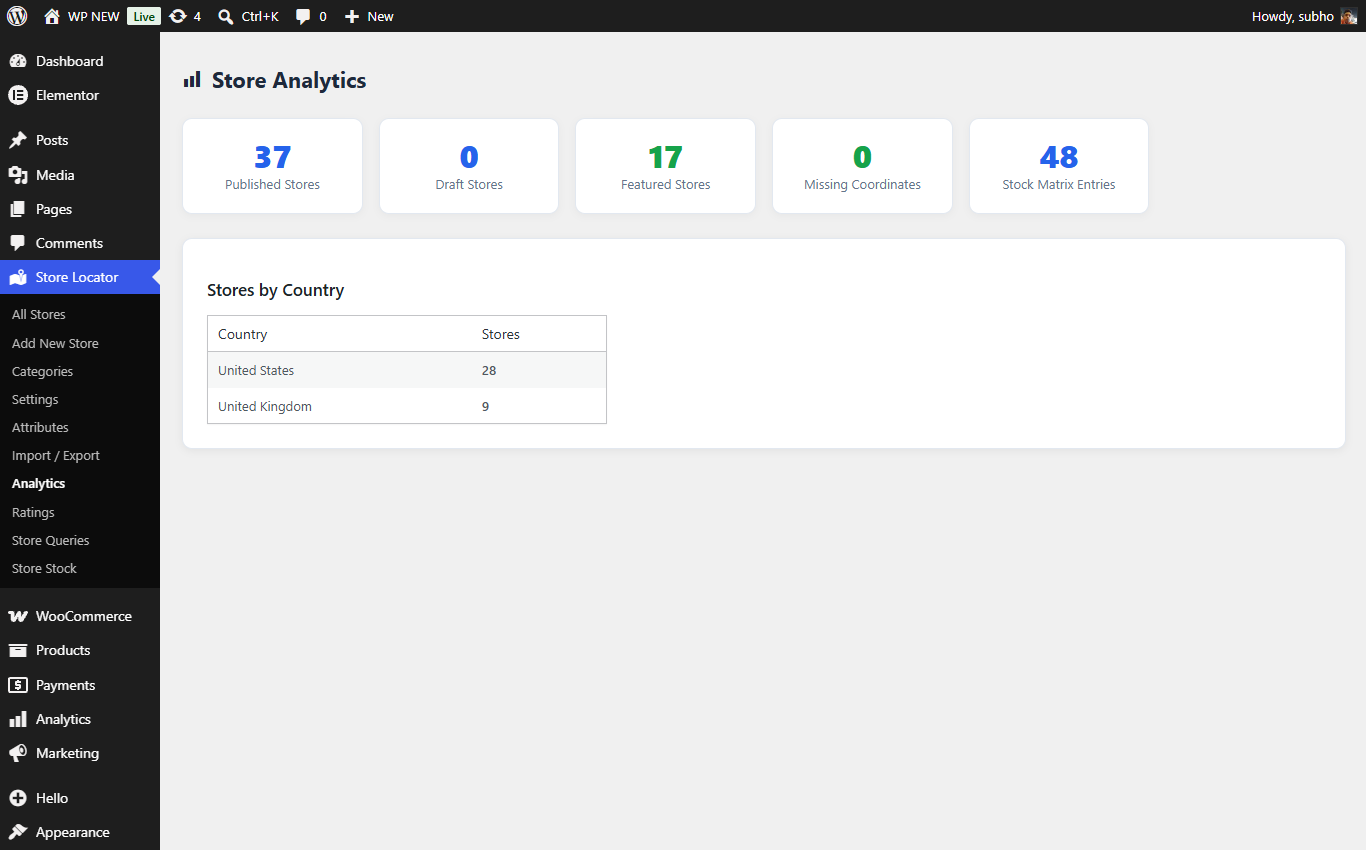
Store Locator → Analytics: see what your visitors search for.
A simple dashboard showing how your locator is used — searches, popular stores and more. Great for deciding where to open your next branch. 😉
If you build pages with Elementor, you don't need shortcodes at all. With the Pro plugin active, search the Elementor widget panel for "DPSL" and drag in:
| Widget | What it does |
|---|---|
| DPSL Map | Just the Google Map with your store markers. |
| DPSL Store List | Just the list of store cards. |
| DPSL Search | Just the search bar. |
Mix and match them to build your own custom locator layout visually.
99% of the time this means the Google Maps API key is missing or restricted. Check Store Locator → Settings → Google Maps API Key. The "API Status" box in the settings sidebar tells you whether a key is configured. Also make sure the key has the Maps JavaScript API, Geocoding API and Places API enabled in your Google Cloud console. Need a key from scratch? Watch this video tutorial.
Open the store, go to the Map Coordinates tab and check it has latitude/longitude. If empty, re-save the store (auto-geocoding will fill it) or click the position on the mini map (Pro).
The Free plugin was deactivated or deleted. Reactivate the Free plugin first, then activate Pro again.
Go to Settings → Permalinks in WordPress and simply click Save Changes (you don't need to change anything). This refreshes WordPress's URL rules.
Your browser or a caching plugin may be showing an old copy. Clear your site cache and press Ctrl+F5 in the browser.
Check Settings → WooCommerce: the button must be enabled, the product must be in stock (if you enabled "hide when out of stock"), and WooCommerce itself must be active.
No — ratings are limited to one per user account, or one per visitor (by IP address) for guests.
No. The Advanced Export deliberately leaves your API key out for security, and importing a file never overwrites the key on your site.